How to move an article from one collection to another?
Example video (for extensive step-by-step plan, see below)
1. Make sure your article or collection is set as "Shared with all members". It is not possible to change the loction of the WiP material (grey layer) within the platform.
Click on "Bewerken" on the article.
Check the "Shared with all members" and then, click on "Bewaar".
2. Go to the collection where you would like the article/collection to be placed in, and click on "+article" (or +collection, if you are placing a collection inside a collection).
3. In the pop up window, type the name of the article/collection that needs to be relocated.
4. Click on the article when it appears in the "Zoek pagina" window and click on OK.
5. Now your article has been added inside the collection. However, it is still linked to the previous collection.
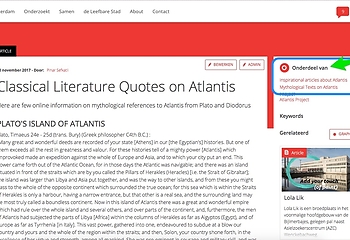
PS: It is possible that an article is linked to more than one collections. You can check the collections that the article is lined to on the "part of" section of the article.
6. Go back to the collection where you wanted to remove your article from, and click on "Bewerken".
7. In the "contains" section of the collection edit page, cross the article out. This way, you remove the link between the article and this collection.
A collection is to be considered an organisational item. It always contains articles (or othe rcollections) and can provide a short introduction to the theme that ties the articles in the collection together. New articles and collections as well as already existing articles and collections can be added to a collection. In this manual we explain how to add articles or collections to a collection and how to edit a collection.
Note: you can only add a collection if you are the owner of a collection or participant in a workspace. To read more about your rights and access, check the manual Rights and access on Openresearch.
Example video (for extensive step-by-step plan, see below)
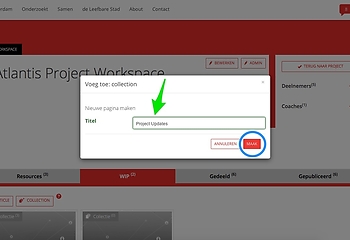
1. Go to the Workspace or Collection where you want to create your new collection and click on "+collection".
To read about what happens in creating the collections in the different tabs of the workspaces, go to the manual for Editing the Workspaces.
2. A new window will appear asking the name of the collection. Please type here your title and click on "Maak" button.
3. In the edit page, control your title, add a samenvatting and/or a subtitle for describing what are the contents of this collection.
The summary window is used to tell what the collection is about in no more than 5 sentences. At the bottom of the edit screen is a body text window with more space for text and formatting.
4. Go to the body text and add a text, a media item or a link, to give further explanation on this collection.
Here you will find more information about the different layers of publicity on openresearch.amsterdam.
If you want the collection to be shared with the users of the paltform, click on "Share with all members".
For sharing the collection only with the members of your project group, click on "Work in progress".
6. Authorship is important in creating new material. As the logged in user, you are automatically the author of a new collection.
Only the authors can edit that collection or add new materials inside the collection.
If you want more people to edit the collection, click on "+voeg toe: auteur".
Type the name of your group members who you would like to have as co-authors. Then click on their names.
7. Add a banner (background image or color) to the collection.
Go to the banner section.
Click on "+ voeg toe: banner"
Click on "choose file" to add a new image
Do not forget to mention the source or photographer of your image under the media title. For example: 'Source: Wikipedia.org' or Photographer: Edwin van Eis.
8. Add an icon (small image at front) to the collection.
Go to the icon section.
Click on "+ voeg toe: icon"
Click on "choose file" to add a new image
Do not forget to mention the source or photographer of your image under the media title. For example: 'Source: Wikipedia.org' or Photographer: Edwin van Eis.
9. Change (if necessary) the order of items in the collection, or remove an item.
To edit the order of items in a collection, see the "bevat" section.
Hold your click on the left side of the items you want to rearrange, and change their order.
Cross out the items you do not need by clicking on the "x".
10. When you are done with working on your collection, click on save